Friday, May 15, 2015

Motors

What's a Motor

A motor is a contraption that has a current carrying wire and magnets. In this case, we made motors out of wire, magnets, and battery. The current carrying wire, current from battery, feels a force in a magnetic field and the force causes a rotation, or torque. This is how my motor worked.
*A motor has current bearing wires and magnets.


My motor looks like the one in the picture above. It span freely on its own in the paper clips and the paper clips plus the other materials all helped the motor become a motor.
The paperclips were attached to the ends of the battery, they were used as the stand and conduct current to the wire. The wire was the current carrying wire that span as a result of the current flowing, since it was in a loop. The magnet supplies the change in magnetic field which causes the torque, and the battery supplies the current for the whole contraption.


The Making

To make this fully functional, I had to scratch the arms (paperclips) and the wire in a certain way. I made the paper clips in a certain way, like the picture, to hold the wire freely in the hole and scratched to allow current to flow through the wire. Now the wire was scratched on one certain side to also allow the current to go through freely. This is because the copper on the wire tops (the coating) would cause no current to go through and if we scratched it all over, it wouldn't make a complete circle when spinning. (right hand rule applies here).

This wire spins because of the moving charges and current going through it. The magnetic field is going up, the current goes across the wire, and so the force of the loop is to the side of the wire, which creates a torque and spins the loop.(Again, the right hand rule)

All of these moving charges feel a force from the magnetic field and they move away in such a way to the field, perpendicular. 

One whereabout you can find a motor like such is in an engine. Thick wire, when you turn on the current will cause a spin to the propeller and cause the push against the water so the boat can accelerate forward, or back.


Wind Turbine

We Made Electricity!
So, Recently in class we were making wind turbines. It was a fun activity and what we did from it is generate electricity. Here are all the materials we used to make our turbine:
-Boards of wood
-2L Soda Bottles
-5 Bolts 
-5 Magnets
-Styrafoam
-Wood Stick
-Glue
-Copper wire

The wood was for the base of our wind turbine. Our group made it look almost realistic to a windmill. The soda bottles were cut into fourths and used as the wings for the turbine where the wind it. The bolts were glued into the styrofoam, as our wings were put in to rotate on, with our magnets attract/stuck onto the bolts. This helped for the stick to be glued onto this styrofoam with everything on/attached to it so when the magnets rotated over the base, the copper wires were hit by this magnetic field.


Physics Concepts

Let's go back to day 1-3; Newton's Laws. All 3 of Newton's laws were reintroduced and shown in this experiment. The first one; an object at rest will stay at rest unless acted about an outside force, was used in the case where the wind from the fan blew on the rested wings and made them rotate. Newton's second law states that more force will cause more acceleration, so the faster the wings were rotated, the less mass didn't matter. The third law, every action has an equal and opposite reaction was used in the case that the fan pushed wings, wings pushed fan.
There's one physics concept recently exampled that is the most important one in this case is electromagnetic induction. The coils of wire, when a magnet is moved around them, causes a change in magnetic field which induces a voltage and causes a current. This is what actually generated our electricity.

Our WindTurbine:

Here is our magnet placement in our wind turbine. We had 5 magnets attracted to 5 bolts glued into the styrofoam. These magnets, when rotated by the wind, rotated over our 5 coils of wires as you can see were taped and glued down to the base of wood. When rotated over the wire, the magnets caused a changed in magnetic field and induces a voltage and causes a current, which generated our electricity. We didn't have a picture of the coils close up, but here is the two in one for the magnets and coils, the process of electromagnetic induction.

 Here are our wings for the turbine. Our wings were made out of a quarter of a 2 litre bottle. these wings helped us rotate the magnets over the wires. The reason we chose big wings/bottle was because our middle/styrofoam magnets circle was a big plan so we needed much wind to be forced onto the system so it will have an easier time rotating and forced.


Here is our full model. We used tall wood to keep the wings from hitting the ground or table. We also wanted to make our wind turbine look realistic, and I think we would've won for a creativity section.


This is our video of our turbine working! We generated both .007V&A. This is too low to light a light bulb though, because we didn't generate enough voltage. Don't worry, we'll work on that!

Some things that caused us to get a low voltage was:
1. Our magnets when rotating kept hitting the coils of wires which caused the wind turbine to not spin as fast or consistent. This was friction.
2. Our coils got messed up while spinning them, so that could've been a factor of not generating not enough voltage.
3. The magnets could've been poled differently, which generates different magnetic field which would cause the current to be back and forth and not generated correctly.

If I could do this project again, I would make my base the same. In the generator area, I would make a bigger coil of wire and have the magnets spin inside of it instead of over it. Going through the coil has a better electromagnetic induction because it changed the magnetic field more instead of over it. I would also make sure everything is perfectly measured and equal torques of the wing side and opposing side of the rotating part. This all will cause a smooth, better running and electricity generating wind mil.

Tuesday, May 12, 2015

Unit 7: Opposites Attract

Like Paula Abdul said perfectly in her song; opposites attract! That's right, this unit was all on magnets! If that's what you were thinking of when I said opposites attract.
Alright lets get into magnets!

Magnets

Magnets has 2 pole, North and South. What!? This is just like our earth! Except in our earth, the magnetic poles are flipped, which means South is our North and North is our South; confusing, yes I know. These poles direct the way the magnet attracts/repel:
As you can see the north pole forces out, while south pulls in. This causes the opposites attract and like not to attract, since like 2 North pushes away from each other.
Going back to our earth being flipped, what I meant was compasses, they point North right? Wrong! Compasses actually align with the magnetic field of the earth and follow the arrows. Looking at the picture above you can see that the arrows of a magnetic field around the object go South. So North is our South.

Motors

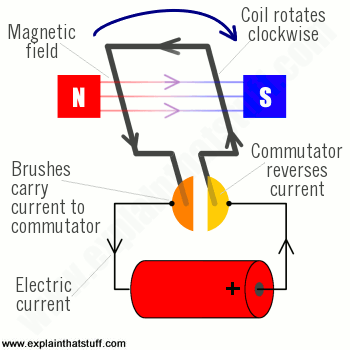
Motors in the unit of magnets? I know, I thought the same thing, but motors actually run by magnets. A motor is a current carrying wire in a magnetic field being forced in a certain way. Motors use Alternating current for it to run. Here is diagram for motors:

ElectroMagnetic Induction

Big Words! Electromagnetic induction is charging a wire/creating a current and voltage with a source of a magnetic field. We see this in our everyday lives, but just don't notice it. Traffic lights have this! Here's a video over how electromagnetic induction works in a traffic light:


Transformers

Transformers help us out so much. They are in our laptop chargers, wire poles, and other appliances. A transformer is a tool in a wire setup that either steps up or down the voltage and current for an appliance. Transformers have 2 sets of coiled wires, the first set is the primary coil and the secondary coil is the second one. The first one, lets say has 100 coils and supplies 10V from the wall, your computer needs 1V to run, so the secondary coil will have 10 coils because P=Psecondary. These transformers work through electromagnetic induction also. 

Monday, April 13, 2015

Unit 6: It's Electric!

Charges & Polarisation

Charges, ok, Im pretty sure most of you know the two charges. Positive and Negative charges! These two charges attract one another, but like charges (2 positives/negatives) repel. When the charges connect/complete the circuit, a flash, noise, and heat is given off, like lightning. Here we learned that and Coulomb's Law which is Force is equal to K(constant)*charge 1*charge 2 all over the distance between the charges squared. 
Polarisation is when in an object the positive and negative charges are neutral but separated from one another. This is how water is attracted to a rubbed pole or how our hair sticks up when we rub a balloon on it. The actual reason is the balloon and cloth rubbing the pole is stealing, through friction, our electrons. When the balloon is pulled close to a wall or our hair it attracts the positive charges and sticks.

Another way to steal electrons or charges is through inductions, which is not even touching the object.

Electric Fields

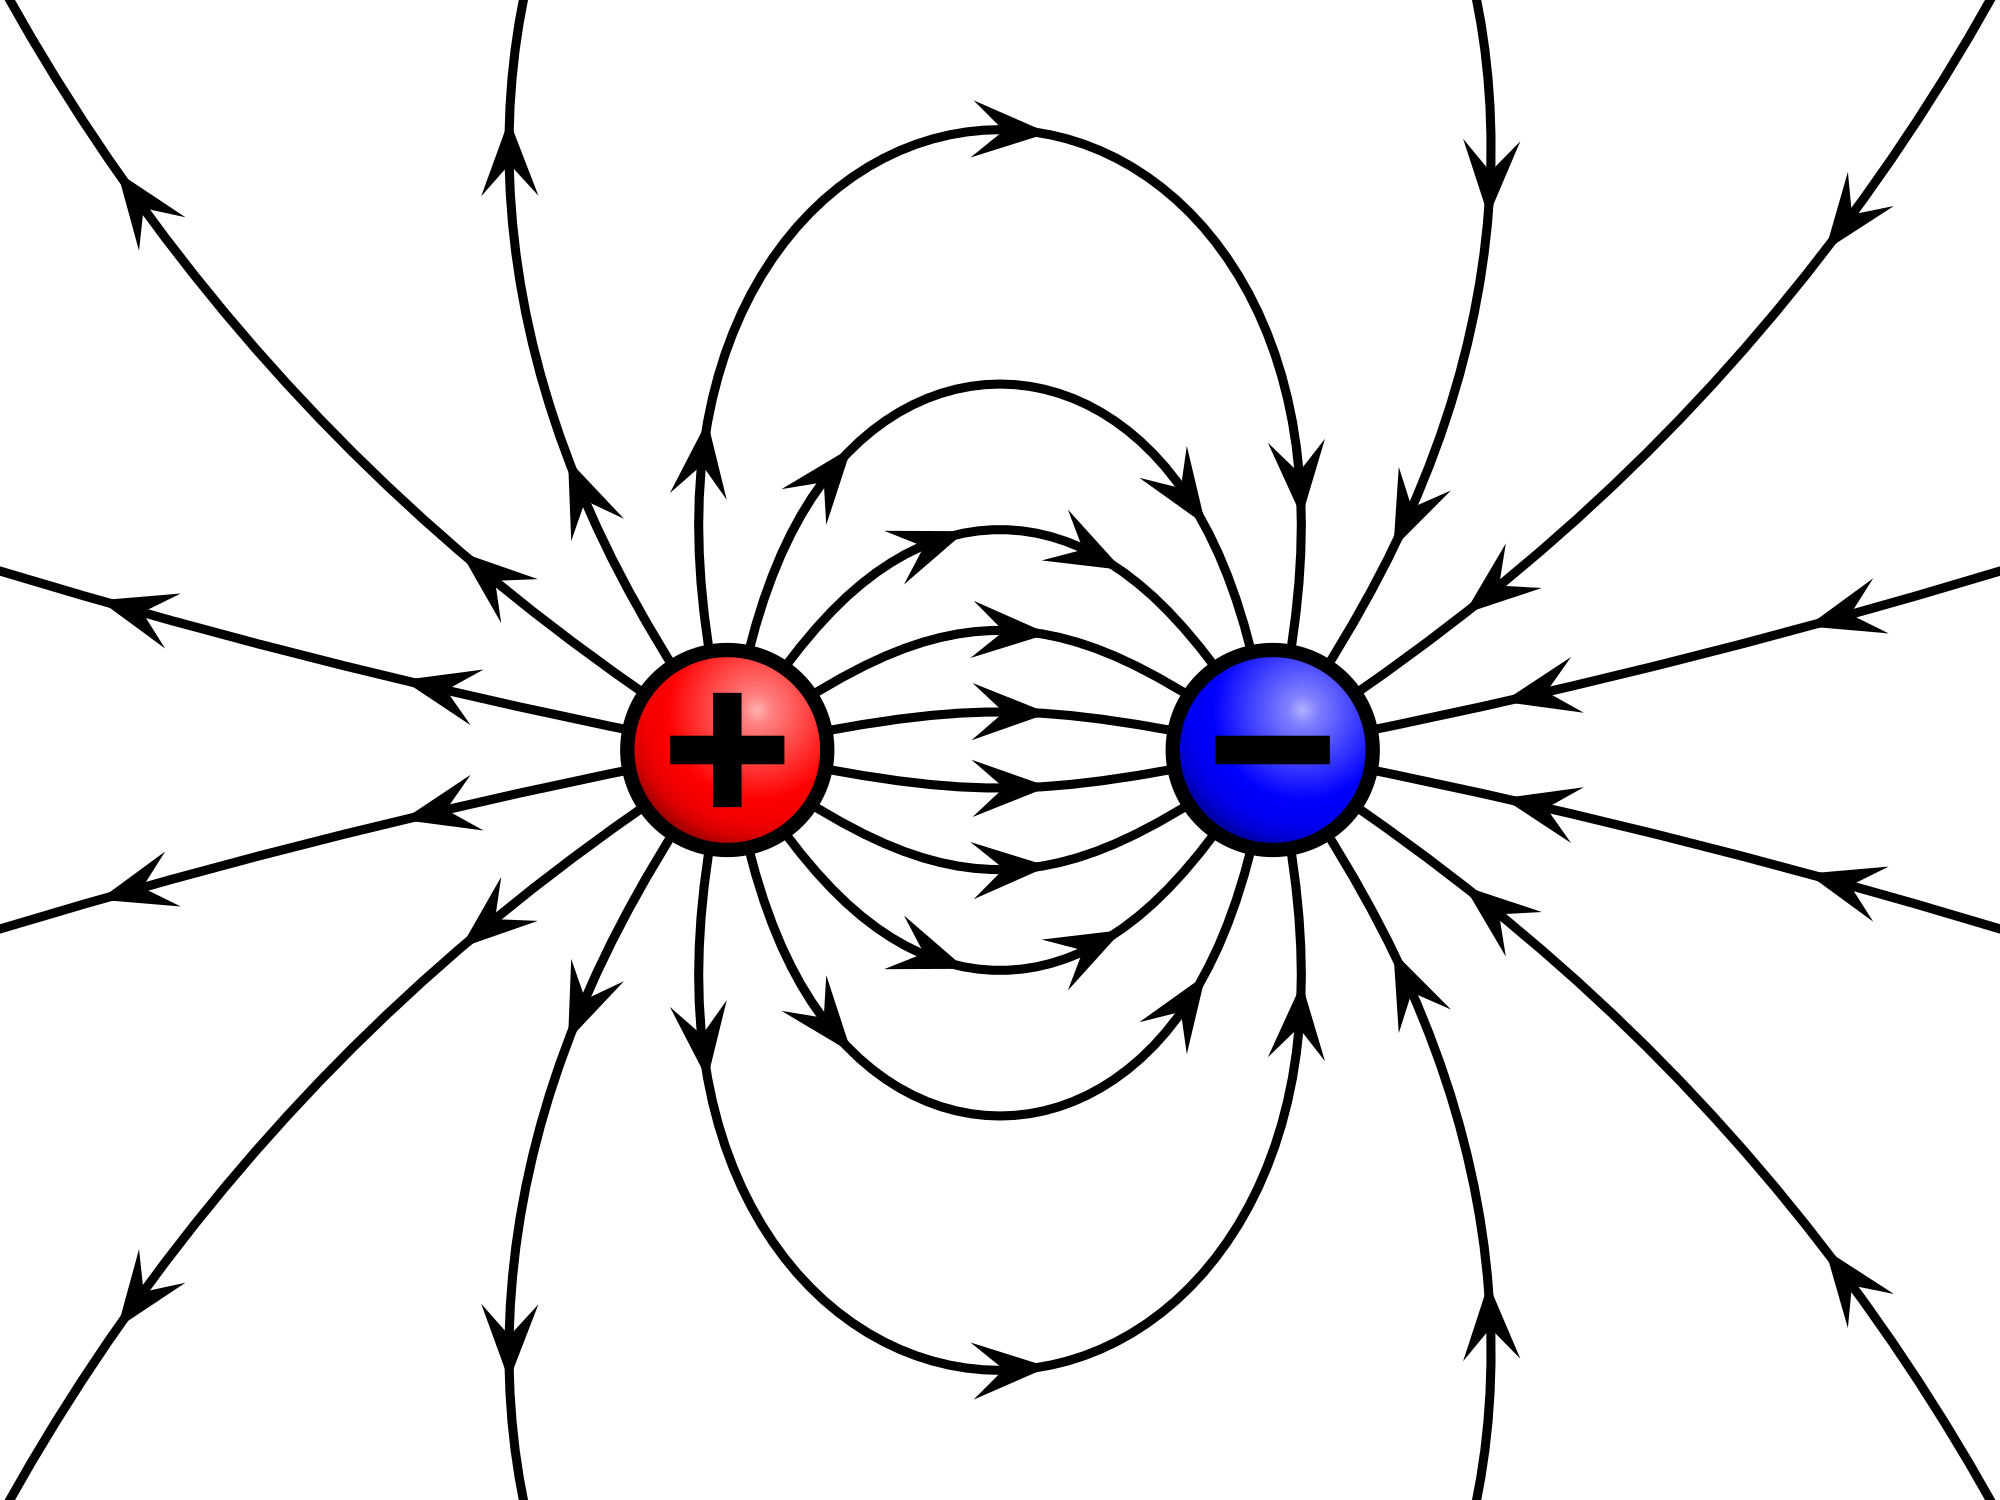
An electric field is when an object emits either a repel or pulling in force. The arrows you see in this next picture show where positively charged charges go from the certain particle. 
Shields can help too. Appliances are not supposed to get more than one type of charge or else it will be ruin. This is why we put our appliances in a metal covering. Metal is neutrally charged and has property that takes in a charge to balance it out. This is known as an electric shield.

Electric Potential & Capacitors

Alright, Now into some more information about equations, but first let me tell you what electric potential is. Electric potential is potential energy over charge, this is also known as volts and is measured in volts. Difference in this is going from high to low just by subtracting the low FROM the high volt. If there is a high difference there can be a shock and if you are causing the connection from high to low, lets just say shock. 
Capacitors are what cause flashes and other useful tasks most of our appliances use/perform. It's two plates that are charged timely and when you press the button for the picture or flash, causes the plates to touch and a flash happens. This is again the attraction of like charges.
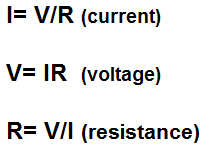
Now we get into Ohm's law which is Current (I)= Voltage(V)/Resistance(R)
We can calculate any of the three if we have enough info.

Current

There are two types of current: Direct Current and Alternating Current. DC is when the current flows in one direction while AC current is go back and forth. It's funny because the electrical company doesn't supply us electricity or voltage, they supply us with current.

Circuits

Like current there are two types of circuit: parallel and series. Parallel are where each appliance is wired directly to power/voltage source while series is where everything is connected in one line. When one appliance turns off or is taken out of a series line, the rest following it from  high to low are turned off. In a parallel circuit, this doesn't happen, they all stay on. 
Fuses, they help prevent fire. You can put them at the very beginning of parallel circuit or ending, never in a series circuit. When too much current is going through them they completely break and cause the whole circuit to turn off, which prevents fire.


Wednesday, March 4, 2015

Mouse Trap Car

Mouse Trap car? What could this be? A Moving mouse trap? Yes!
Our assignment was to create a car out of anything we wanted or gathered and make it powered by the force of the mouse trap and it had to go 5 meters.

How we constructed it

For this project, Winston was my partner. What we did was construct a 4 wheel car, using metallic disks for wheels. The main body of the car was made out of wood we got from our local Lowes store, and so were the axils. For the axils to spin in, we stuck them through some pvc pipe and fastened it to the car's body. Then, we hot glued the mouse trap to the car and attached a lever arm with a string, which we later changed to rubber band. This rubber band was to wind up on the back axil, pulling the lever arm of the mouse trap, so it could, when let go, run by being pulled by the elastic and mouse trap combined. We made sure to not tie it onto the axil because if we did, once done unwinding, it would cause the wheels to stop.

Video of our car


In this video, are car just made it to the 5 meters mark, but then rolled back an inch.
We did more test after this video, but with this video our time was about 10.03 seconds. We calculated the velocity of the car to be, using v=distance/time, 0.49 meters per second.

Picture With Labels

INSERT PICTURE

So what does this have to do with physics?

This mousetrap car brought all of the 3 of Newton's laws together in one project. How? Well, Newton's first law states that an object in motion tends to stay in motion unless acted upon another force, once we got that axil in motion from the mouse trap, it will want to continue to stay in motion, or rotate. The car also was affected by this, once moving it was moving, but the friction from the pipes and the ground made the car slowly slow down which was the "acted upon another force". The only thing that could prevent that is friction with the ground. Adding the free rolling wheels reduces this, but frictional forces on the axil must be reduced to maximize free rolling.

The wheels pushing the ground back, the ground pushing the wheels/car forward, and the rubber band pulling the axil, the axil pulling the rubber band, were both examples of Newton's third law. This law states that every object has an action and reaction force. This pushing car also explains the acceleration=Force/mass. This was Newton's second law. The bigger the mass, the less acceleration, but the bigger the force, which we did with a rubber band increased our acceleration, but since we had a big mass, it didn't cause that much of an increase.


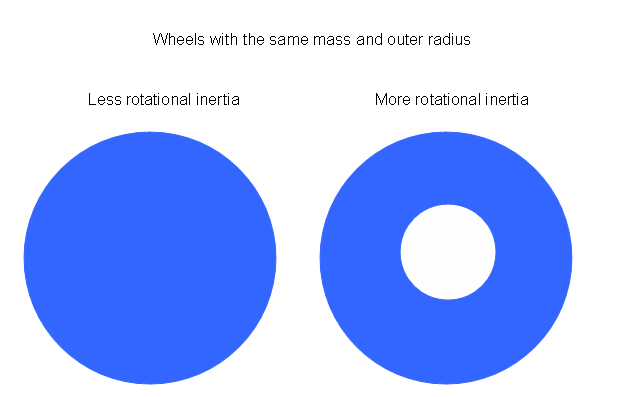
More about the wheels, in the latest units we learned about rotational inertia. Our wheels for our car were somewhat bigger than others, why did we choose them big? Doesn't more mass cause less acceleration? Yes, more mass does cause less acceleration, but our wheels were very thin. The more mass not he outside of the axil would cause more rotational inertia, which is bad, meaning it wouldn't rotate easily. The reason we chose them having a bigger diameter was because this increased the tangential velocity, which is the time/speed it takes to do one rotation on the outside. Since we had the force in the axil of the wheel, the outside had to spin faster to do what one slower rotate in the middle did, so our car went, or was supposed to go faster, this is explained more later in this blog. Also, why our axil rotated was because when the mouse trap set off, it caused torque which was rotation. We added a longer lever arm to increase how much of the axil was going to spin more, not to increase the force, because when lever arm increases F decreases. the lever arm was to increase the rotational velocity of the axil.

The mouse trap stored elastic potential energy when it was set, this energy was conserved. It was conserved because once it was released it was transferred into kinetic energy, which the ability/wanting to move, which the car did with this forced spinning axil. This spring on the mousetrap was setting off force in an upward then downward way while the distance of the car was going forward. We know work=force times distance, but the force and distance aren't parallel. Potential and kinetic energy are equaled to the change in work, and since there is no work, we couldn't find how much of these energy there was in this car. We can't calculate the force because it's in different ways/areas.

Reflection

Our final car changed from what we planned. What we planned was a small car, but powered the same way. We ended up with a big piece of wood as the base. What caused this big car to be big was we needed materials so we rushed to get them not thinking of the physics behind this project at the time, once we started, then is when we knew we should've went smaller. The major problems was that our axils for our wheels didn't have anything to rotate in, except some hoop we made from sticking tape together. We resolved this problem by using pvc pipe so the axil ran smoothly through it. If we did this project again or any building project, we would probably go smaller, depending on the project, think of all the physics concepts before the materials, and make sure everything fits perfectly once we get the materials, because if you have a smaller axil than its hole to rotate in, then it's going to start turning a lot, which wastes energy. 

Tuesday, February 24, 2015

Unit 5: Do you work?

Alright! This unit was short, which made it great! This unit was all about work, power, and energy. Let's get into this:

Work & Power

Work is found by multiplying distance and force not he object. The distance has to be the height the object is being forced on, not how long it goes. Work is measured in Joules (J) and the force and distance have to be parallel for there to be work. So, if I walked up the stairs, let's say I'm 600N and went up a 20m stairs, I did a total of: (20*600)=12000Joules of work. 
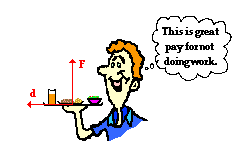
Here the waitress isn't doing any work because the distance and force aren't parallel:


Power is found by dividing work by the time it is done in. So, with my stairs example, I did a total of 12000J work, let's say it took me 10 seconds to go up the stairs, 12000/10=1200Watts. Yes, power is measured in watts.
Here is a video of our project explaining work and power:

Energy

Work, Power, and Energy are all related. We can find kinetic and potential energy with information from power and work. The change in kinetic energy is equal to the change in potential energy, and equal to work. If not given any detail from work and power, the kinetic energy formula is 1/2mv^2. m is mass and v is the velocity of the object.
Kinetic energy and potential energy are conserved, and you will see that here:

When high above ground, you have potential energy, but when falling or dropping, you gain kinetic energy but lose potential energy. Let's say you have 1000 PE, when you're 25% down the drop, you have 250 KE and 750 PE, vise-versa for where you are in the drop. This is the conservation of Energy.

Machines

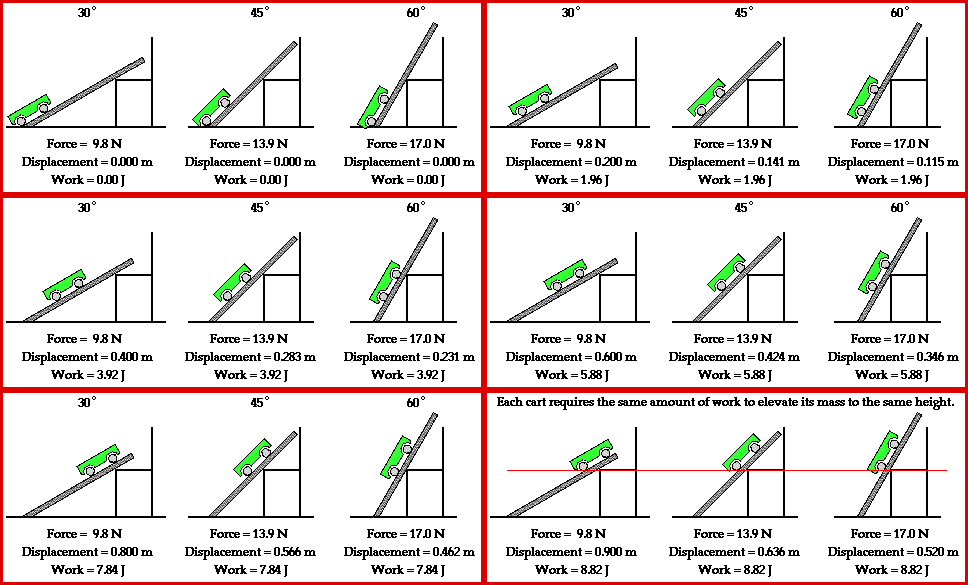
This is the last thing we learned in the unit, I told you it was a short one. Machines make work the same, but easier. It doesn't reduce it, just reduces the force that you have to do by increasing the distance. This is a good example of ramps. Ramps to get heavy stuff in a truck help you do so by letting you go up a bigger distance with less force.

Monday, February 2, 2015

Unit 4 Review: Rotate? Or Nah?

Rotational Inertia & Tangential Velocity

Rotational Inertia is the willing an object has to turn. If something had a high rotational inertia, it's going to take more effort for it to rotate, and low rotational inertia will be a higher chance of rotating. To have a high rotational inertia, the mass of the object if spread out unevenly or far from the point of axis, like a hoola-hoop or volleyball. To have a small/low rotational inertia, mass has to be spread out evenly throughout the object and/or close to its centre axis, like a bowling ball and a meter stick with weights closer to the centre axis. 


Rotational velocity is how fast the spot on a circular object is moving. Every spot on the object have equal rotational velocity because they travel the same circle in same amount of time. Tangential velocity is different from rotational velocity. The further out you go from the centre of the circle rotating, the faster you'll be going tangentially. This is because you are now traveling a greater distance in the same time, the middle little distance in same time.
This leads to the conservation of Angular Momentum:

Conservation of Angular Momentum


This conservation explains the certain angular acceleration of, lets say, an ice skater. When she brings her legs and arms in, she decreases her body's inertia.

rotational velocity x rotational inertia = rotational velocity x rotational inertia

Torque

Torque depends on two factors, lever arm and force. Torque is the willing an object is going to rotate. There is the objects clockwise and counter clockwise torques (for which way it will rotate). Ever hold a baseball bat on one finger and see it balances with more of the little side on one side compared to the big side. This is because of conservation of torque. The two sides don't weigh the same, they just have equal torques which make them balance. This is an example of the equation of conservation of torque:
force x leverarm=force x leverarm.

Centre of Gravity and Mass

Going back to the baseball bat, where your finger is, see how it's balancing there, that is where the centre of gravity of the bat is. The centre of gravity is where the force of gravity mostly affects an object. It is 99% of the time directly in the middle of the object. Centre of mass is the same thing of centre of gravity but can be changed. Let's say you are standing still, your centre of gravity is over your base of support which is your feet. Then you are given a large box to carry, you lean back, why? You are adding mass to a side of you so you balance out your centre of mass by keeping it over support. If it leaves support, you or the object will fall over. Objects tilting over and don't fall are objects who's centre of gravity is over support, just like the Leaning Tower of Pisa. 

Centripetal and Centrifugal "Forces"

Why is forces in quotes. This is because these aren't really forces. They are a description or example of a object being affected. Centripetal is when an object is being pulled/rotated back into the rotational of an object, like a cup on a string. The string is the centripetal force pulling the cup into the centre. Centrifugal is the opposite. Just remember they're not forces, just occurrences.